Showing posts with label flour resist. Show all posts

Wednesday, April 14, 2010

Flour Paste Resist With Marti Plager


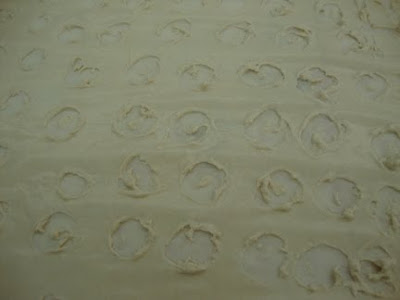
Fabric with flour paste applied and overpainted with 2 shades of thickened dye.


Recently I published an article on flour paste resist and asked anyone who gave it a try let me know how it went and if they like the results. Marti Plager of Louisville Ky. answered the call and sent along pictures to share as well as some notes on how she used the process.

Marti wrote: Here are pictures of my exercise. I was trying to get the effect of tracks in snow. I love the fabric but I should have done more manipulating of the image for whitness and brightness but I didn't take the time.

I read Jane Dunnewold's article on flour paste in the Feb/March 2008 issue of Quilting Arts. She uses a 1 to 1 ratio of flour to water. I used your instructions and ended up using more flour so the ratio is probably 1 1/2 c water to 1 c flour. I had doubled the recipe and had plenty left over. The fabric measured 20 x 65 inches.

The technique is amazingly fun especially in warm weather. Now to use the fabric in a piece of art.

Marti says she is excited about the process and loves that it is cheap and available and will head to the grocery tomorrow to buy the cheapest flour available. She said I could quote her on that!


This shows the piece of fabric after it was washed and dried. Notice how good the resist is. The edges are very dark and the part that Marti did not draw into is very white.

I like the idea of using more than one color to paint the piece. I did that on my last piece but the two greens were too similar and it did not show up. I also concur with Marti that this is the time of year to be doing this. The warm weather not only helps dry out the resist but helps set the dye. A win win.

Thanks again Marti. Looking forward to how you use the piece in some of your beautiful work.

To see more of Marti's work click HERE.


Tuesday, April 6, 2010

New Flour Paste Formula


Some time ago I did a couple of pieces using Flour Paste as a resist. I loved the results but the paste itself was difficult to apply and the window for application was very short. You can see those results Here. Next I tried a Potato Resist which also gave good results but I found it just seemed unnecessarily messy to apply, especially if you wanted to spread it to a large area.


Both of these resists give interesting results so I was interested when I read an article on my friend Judi Hurwitt's blog. Judi has been experimenting with this paste and gave the formula in a recent article so I decided to give it a test.

Judi's formula is: 2 cups water to 1 cup flour. Whisk these together and apply.

I like to work large so I laid out a piece of fabric that was 45" x 45" expecting to use part if not all. In light of this, I doubled the amounts of water and flour to:

4 cups water
to
2 cups flour

The ingredients blended together nicely but I felt it was too watery so I added additional flour until it was like thin pancake batter. I estimate that I added 1 additional cup.

The fabric had been soda soaked and dried and was then pinned to a fabric covered support board. I applied the paste to the fabric by pouring across a width of about half the fabric and then spread it with my trusty bondo scraper. Working my way across and down the fabric, this amount of paste covered an area of 29" x 45". Because the paste is so fluid it would be possible to mix and continue to cover your fabric if you choose to do so.

This mixture was a pleasure to spread. It is easy to create thick and thin areas and I could see that the fabric underneath was already absorbing the water from the resist so I knew it would dry quickly. After the paste was applied I used a chopstick as a drawing tool and drew into the paste. As predicted, it was drying fast and I worked quickly to make my marks. It is not an issue of not being able to continue to draw into the paste but it does start pulling up off the fabric as it dries more.


Marks in wet resist


Marks in wet resist


Marks in wet resist

I left this in an unheated studio with a fan positioned to aid the drying and by the next day it was dry to the touch. I did leave it until the afternoon before I applied dye. The surface is really beautiful. It is smooth and leathery where there were no marks and a great ivory color. There was only a small amount of crazing so I did scrunch the fabric up some to add cracks.

I mixed a medium shade of moss green and thickened it with print paste. This was brushed onto the surface. The application on this surface was much easier than onto my first flour resist piece.


Thickened dye applied to dried resist.


Thickened dye applied to dried resist.


Thickened dye applied to dried resist.


Again, this dried very quickly. It took only about 24 hours to dry. I did check the back to see how the dye had penetrated the surface and decided to pick off some of the flour resist and apply more dye. In the final piece you can see some larger areas of the green and these are the areas I opened for more dye absorption.

I only waited 4 hours before removing the resist and dye. I loved the surface on the piece and would have just left the paste on if possible. At this point I am not sure if I will add more color to the fabric, try to finish the piece as a whole cloth composition or cut it into pieces to be used in other compositions. I will definitely use this resist again and this study proved that experimentation is often required to get a mixture adjusted to a usable state.

Thank you for stopping by and I love to hear your comments. Please, if you try this resist , let me know how it works for you.

Saturday, November 7, 2009

Weekly Textile Construction #27

About a year ago I attempted to make a resist using mashed potato flakes. It turned out to be so effective that after it dried I attempted to crackle the surface, applied dye, washed the fabric the next day only to find a mostly white piece of fabric. The resist has resisted too well. It was just too much trouble to try again at the time and I moved on.

I have been think a great deal about surface for the past 6 months so this week I decided to attempt this process again but substituted flour for the potato flakes and had a much better experience.

Click here for formulas.

I applied this paste (all of it) to a dry unwashed piece of PFD fabric. The fabric was about 20" x 20" and had been pinned to a ridgid board I use for surface design. The full batch of paste barely covered the surface. The fabric soaked up the moisture from the paste so I had to work fast and not much time to move the paste around once it was spread. Once I had moved it around as much as I could I used the end of a plastic spoon and drew into the still wet paste.


Full view of design drawn into the paste. Notice the thin spots at the bottom.


Detain of the paste with the design applied.

It was warm that day so this dried quickly. Once dry, I mixed a concentrated dye solution of about 5 TBsp of Black dye powder with 1/2 cup water (more or less). Then I put 3 Tbsp of this mixture into 1/2 cup of print paste. Click here for these formulas.

This dye mixture was brushed onto the face of the fabric and left overnight to dry.

Looks like an awlful mess but the next day I sat it out in the sun to dry.


Here it is on it's board sitting on the hood of my car.

Within a few hours it was nice and dry. I folded it up and put it on a baking sheet and heated it in the over for 5 minutes at 200 degrees. You should never eat this thought. Would give you a bad tummy ache.

From the oven it went into a bucket of water to soak for about 15 minutes. I then used a plastic scraper and scraped as much of the dried paste off the surface as possible then gave it a really good hand washing before throwing it into the washing machine.

Amazing! What a super resist. I am really happy with the results. You can see where the thin spots of paste were but I think that gives it character.


Detail of washed surface.


I have been thinking about new ways to treat my work so I decided to sew this directly to a piece of black canvas which I did. I used a sort of pink/beige thread.

I'm not finished stitching but wanted to share with you as it is now. I plan to throw it into the washing machine when I finish stitching to see how that impacts the look of the piece.


Detail of top edge.

Now this is something I can explore.