Showing posts with label design process. Show all posts

Tuesday, November 27, 2012

What About A Focal Point


Eyes in the Heat
Jackson Pollock


I'm sure most of you are familiar with the concept of a focal point in your artwork.  The general idea behind this concept is that "fine art" is made primarily for aesthetic purposes and therefore must have a central element to make it unique and interesting to view.  Work that is considered "decorative" or from the "crafts" are often not required to have this element.  

"Why" you might ask would crafts not need a focal point?    Because "decorative" work has a "function" and is often considered to be a support player and not an intellectual equal to fine art.  You know I don't agree with this thinking.

So - while viewing an exhibition I was asked by another viewer about the absence of a focal point in one of the works.  It was a show of textile constructions.  My response was that the entire piece was the "focal point" and that the piece was made to be viewed as a whole.  The work was a type of pattern piece rich in color and texture and while the various "repeats" were different in color combinations and the elements were hand-cut, there was a definite repeated pattern which drew the eye all around the composition.

Today artists used any process or material they like and many use them any way they like and there is a wonderful blend of fine art and craft traditions.  

The above pictured painting by Jackson Pollock is a good example of an all-over pattern or texture with no focal point.  This is from his action painting series for which he is most famous.


No
Jasper Johns


No by Jasper Johns is a nice example of a very subtle focal point or no focal point.  The soft modeled  gray texture creates a beautiful surface broken only by a few marks and the small pale square at the top left.  Is the square the focal point or the small cluster of lines at the center bottom or the full measure of the painting?  I choose the full painting.


Who's Afraid of Red, Yellow, and Blue?
Barnett Newman


Who's Afraid of Red, Yellow and Blue by Barnett Newman is another example of the entire picture plane being the focal point.  To be very strict about this we could however say the red area is the focal point with yellow and blue setting it off....

How about an example of a textile piece that is presented as art and does not feature a focal point.


Crazy Quilt
Unidentified


This beautiful work is a form of quilting call a Crazy Quilt.  The name is obviously based on the unexpected compositions within each unit or block of the piece.  There are certainly areas of interest within each block but no single point of interest.  It was made to function as a traditional bed quilt but looks like a piece of contemporary art.  There are elements in a variety of sizes, colors, shapes and textures and to my eye and shares many elements with the Jackson Pollock pictured. 


In the 1970's there was pattern painting which often had no focal point and color field painters often shied away from focal points.  The point I'm trying to make is there are many ways to approach the making of work and every piece you make does not have to follow every rule or guideline as I like to call them.

Have fun.  Go make something that does not have a focal point.

***

thank you for Spending Time at
STUDIO 24-7.

i love hearing from you so
remember...

Commenting is FREE
!!!


Thursday, December 1, 2011

Simple and Unique


Tied Stars - Maker Unknown
United States 1900-1940
Cotton and Cotton and Wool Embroidery
Gift of Mary and Al Shads to American Folk Art Museum


My friend Liz Anderson sent me the image of this wonderful quilt from Super Stars: Quilts from the American Folk Art Museum which will be on view until the end of December. I recently posted my completed Dots piece and Liz thought I might enjoy seeing this work. She was correct.

Last Christmas I was given a copy of Jonathan Holstein's book: Abstract Design in American Quilts: A Biography of an Exhibition. I had never seen this book and I was not aware of the show at the Whitney where these pieces were presented. (I find that hard to fathom but think it is wonderful. You can go here to read more.) In the book there is a piece titled Crazy which is one of my favorites. The piece is constructed like a crazy quilt but the quilt is essentially all white. The shapes which are pieced into the blocks which makeup the quilt are outlined with a sort of cross-stitch in brown or perhaps a dark red. The technique is a strangely sophisticated way to handle a very simple and potentially dull collection of materials. How wonderful. A nice demonstration of someone thinking outside the box.


Tied Stars - detail


I see Tied Stars in somewhat the same way. The maker employed unique thinking to create an interesting work from simple materials. I have no way of knowing of what spurred the idea of using the two shades of yellow to create a star pattern with the nubs of the knots which hold the quilt together. The stars are hard to see in the photographs but you can go the AFAM site and see a different picture. Many times the knots for tied quilts are arranged in grids or rows. I am confident this application of knots took much longer to do than the more usual rows as it had to be designed and marked and there are many more knots than is required to simply hold the layers of fabric together. This quilt-maker choose to make a statement.


The plaque next to the quilt at the museum said: The stars in this unusual bedcover are tied rather than pieced or appliqued. The pointillist effect of this technique creates a diffuse Milky Way when seen up close. At a distance the stars resolve into their defined forms.


It touches me to see the time that was invested in this work. It impresses me that the maker found a way to use this very intense red fabric. I love the hide and seek of the star pattern. I love the texture. If it was ever actually used as a bed quilt I bet it was fun to sleep under. I bet it vibrated. I know anyone sleeping under this had to sneak a hand out and stroke the little star nubs.

This work is a nice reminder that we don't need everything in the world to make art and ideas will always carry the day. Thank you Liz.


Thank you for spending time at Studio 24-7. I love hearing from you and Remember:

Commenting is FREE!!!


Monday, May 16, 2011

The Question of Automation

Recently I met an artist who has just gotten serious about quilt making. During our discussions about technique and process she mentioned that she might have an opportunity to try a quilting machine that has the capability to automatically quilt a design which the quilter creates via a computer. I thought this sounded like a very exciting opportunity as I had read about this technology but have never seen or tried one of these machines.

As I thought about this I recalled seeing references to work which utilized this technology being excluded from participation in a show. At the time it didn't have much impact on me because I don't have access to this type machine but it made me begin to think about why they would exclude such work.

We are in the computer age. We design on computers, create images which we then print on fabric from the computer, people who use patterns created and printed from computers, so where is the line and what is the line protecting?


Before I became involved in the world of quiltmaking and art quilts I had no idea of the improvements in quilt making tools. I recall being completely puzzled when purchasing items to make my first quilt and the store clerk suggested I buy a rotary cutter. I bought one, along with a plastic ruler, but I left the store sure I had been encouraged to buy things I really didn't need. I had a nice pair of scissors at home and had no idea of the usefulness of a rotary cutter. Boy was I wrong!

Since that time I've purchased many items designed to assist in the creative process, some great and some not so great. I have nice sewing machines and a small but nice setup for machine quilting on a frame. I even have a stitch regulator. I don't use it much, but like the rotary cutter, sometimes you don't know how a tool or a piece of equipment will work until you try it in your studio.

I suspect if we could go back in time there might possibly be quilt makers who would object to some of tools and equipment we use today. I have, however, read that quilters embraced machine quilting from the very beginning of widespread home sewing machine ownership. Some quilt makers might feel pride and ownership in their skill of cutting with scissors or being able to hand piece and quilt a work with nothing but a needle and thread. They might scoff at the necessity for a sewing machine. They might not want to allow machine-made work to be included in a quilt show. (Actually I believe many traditional shows do have categories which separate work by the techniques used to make the work.) They might consider work made with a machine lesser than..... These are just suppositions I'm making based on my perception of the pride women have taken over the years in "hand work".

As an artist, I believe I could create the quilt stitching image and allow the machine to quilt it automatically while still having ownership of the work as a whole. Think about artists who design the quilt stitch but have someone else do the quilting either by hand or machine. Artists who work in other mediums pretty much do whatever they like and use technology in any way they like. What is the difference for art quilters or is there a difference?

I suppose the biggest question involves software with built-in patterns. While some might object to the use of that technology, I'm confident that there are ways that these pre-programed built in patterns could be used in very interesting and unique ways.

So what are your thoughts about automated quilting?

If you haven't read about this technology here are links to just two of the many companies who are marketing this technology. I have no hands-on knowledge or affiliation with either of these companies and I am not making an endorsement of their products.


Thank you for spending time at Studio 24-7!

I love hearing from you and Remember....

Commenting is FREE!!


Monday, April 25, 2011

Blind Stitching OR Stitching Blind 2


Equinox - Night and Day
Kathy Loomis and Terry Jarrard-Dimond
2010
Fabric and Embroidary Floss


Two summers ago I attended a workshop at QBL and took a class titled Expressive Stitching with Dorothy Caldwell. It was an interesting experience and has inspired me to incorporate some handstitching into my work.


Day


The experimentation that I most connected with was an exercise where Dorothy had the class put on blindfolds and stitching following very specific directions. This might sound a little strange but from my perspective, the most expressive stitching that was done that week was while we were all blindfolded!!! It is not my intention to insult the members of my class with that statement. My sighted stitching was the most constrained of all. I like to think of myself as able to communicate and "express" feelings and ideas with my art materials but it wasn't happening until I worked blindfolded.


I did all of my stitching at my work table.


Fast forward to fall 2010. I became very interested in a SAQA competition titled Beyond Comfort which challenged artists to expand on the idea of textiles or textile techniques and "Blind Stitching" came to mind. Ultimately I decided not to follow that line of thinking but I did discuss the idea with my friend Kathy Loomis and we decided to do a collaboration where we would each spend time stitching blindfolded and then join the work into one piece.


I threaded the needles without the blindfold but I ended each length of floss with the blindfold in place.


Here is the process we followed:
  • We choose a diptych format. One side black and one white. We drew lots and Kathy got the black and I drew white.
  • We each individually decided on the color or colors of thread we would use and did not discuss it with one another.
  • We each would stitch 12 hours making the piece "worth" 24 hours of blind stitching or stitching blind.
  • We would not look at the work once we began until reaching the 12 hour mark.
  • We would each select what stitch or stitches to use in the work.


This is now the fabric looked before it was stretched. I had not tried to keep things flat.


I'm very happy we decided to divide the 24 hours because I found out very quickly that it was hard to not look. While there was pleasure in trying to "see" with my finger tips, I found it tempting to peek and had to work hard not to do so.


Detail of Day


The best thing was that I liked the feel of what was happening on the fabric from the very beginning. I could feel puckers, bumps, tails, knots, tracks. I could visualize what was happening on the surface although not how the thread colors were working.

I selected about 24 colors which were placed in a paper bag. Each time I sat down to stitch I randomly pulled one skein from the bag, threaded 8 needles and worked until I ran out of needles. I made it without looking until 6 hours in and then I couldn't stand it anymore. I looked. I couldn't believe now nice the work was. I then reframed from further looking until I finished.

I did have issues with tangled threads and sewing in the tails but somehow it all looks just fine now that it has been finished. Kathy did the finish work and she did a bang-up job. Thank you Kathy. Each side is mounted to a stretcher frame and will be hung side-by-side but not attached to one another.

Kathy chose to work with a cross stitch and I did mostly a running stitch although I did work some areas into patches of stitches.

So what's the meaning of this? For me it is an example of how powerful our senses are. Artists tend to be very visually oriented naturally but I believe we also use the sense of touch, smell and sound - even when we aren't aware of doing so. Think installation or performance. In a very real sense Kathy and I created a performance work by quietly sitting and stitching allowing our fingers to communicate with our brains to tell us what to do next.

You are invited to visit Kathy's blog to see her photographs and thoughts on the process: http://artwithaneedle.blogspot.com

I have some ideas of ways to carry this forward. I'll keep you posted.

Thank you for visiting Studio 24-7. I love hearing from you so Remember:

Commenting Is FREE!


Wednesday, December 8, 2010

Don't Forget to Evaluate Value


Spring Swing


My personal opinion is that value is the most frequently overlooked element of design. Most people, especially beginners, go directly to color and put a great deal of thought into those relationships but are often disappointed in how the relationships work or don't work. While there are people who have a great eye for color and value, if you are not one of those people I'm going to share my best tip to begin to train your eyes and your brain to see this quality in your work and be able to see the value. The secret is Desaturation.

The image at the top of the page was actually designed with value before color was introduced. That is not how I generally work but I was curious if I could do that. I drew a composition, photographed it and loaded it into the computer. I then filled the various shapes with value. Once I had the value distributed to my likeing I used a function in Photoshop called Color Balance and introduced colors. Using the Magic Wand, I selected specific areas and colored each one. Next I went to my fabric and pulled colors that were as close in hue and value as I could find and I made the piece from those fabrics.

Looking at the piece today I see areas I would change due to value but overall it works.


Spring Swing - Desaturated


Desaturation is simply the elimination of hue (color) which leaves you with the amount of black or white that was in the color. This can be accomplished by using the Black/White function on some cameras or by taking a photograph of your fabrics or work and then applying the Desaturate function which is available in Photoshop or some other image manipulation software.

If you use Photoshop:

  • Take a photo of the fabric or work, Open the image in Photoshop
  • Under the heading of Image, choose Mode, make sure the image is in RGB
  • Go back under Image and choose Adjustments, select and apply Desaturate
Your color image will be transformed into a shades of gray image and you can see where you have no lights, no darks or generally how your Values are distributed.


Passion

Until today I had never looked at Passion in black and white and was pleased to find that the image and the composition stands up very well. The most interesting thing is the small turquoise element. When you look at the image in color that little elements stands out but look at the black and white image and you can see how close the value is to the area it is connected to. Interesting.


Passion - Desaturated


Most of the older digital cameras have a function which allows you to see images through the lense as black and white and if your camera has this function that is very handy. You don't even have to take a photograph. Unfortunately, the camera companies now don't usually include that feature on the less expensive camera models.

Being able to evaluate the Value before you begin to cut your fabric is a great asset. I have made grouping of fabrics and looked at them before I ever put anything on the wall and realized that it was a dull palette (no lights) or too dark etc.


Shelter


The last example I'm sharing today is a more recent piece titled Shelter. This work has a very narrow color palette, lots of texture and complex relationships. Again, I confess that I had not looked at it in B&W but was pleased when I saw a reporduction of the work in a brochure which was in B&W and I could see that the marks and composition was clear and readable.


Shelter - Desaturated


You may have seen one of those little ruby red pieces of plexiglass that are sold as value finders. If you have 'em use'm - but they do not work with red fabrics and many oranges and browns.

Have fun and Remember....I thank you for spending time at Studio 24-7 and I love hearing from you. Best of all....COMMENTING IS FREE!

Monday, April 19, 2010

Getting "Into" Your Studio


Wet Studio Ready for Action

What does it take for you to get into your studio. Of course what I'm talking about is the process you develop for settling your mind and focusing on your work. After many years of working in the studio most artist do find that they have certain things they do either consciously or unconsciously which allows them to push the clutter of day-to-day life aside and begin their work.

Creativity is a tricky thing. Good ideas often seem to just pop into your head but I believe they "pop in" because you are never mentally far away from your work. However, sometimes the ideas just aren't flowing or you have some issue in a piece that you are having a problem with so you can't just head to the studio and start work. This is a time you may require what Twyla Tharp calls the creative habit. Tharp applies this phrase to many parts of creative endeavor but here I'm just talking about what you need to do to release the outside world and get to the work at hand.

For myself, I find I have to have some sort of order in my studio. I am a casual housekeeper. I don't run around picking things up and dusting and doing whatever good housekeepers do but there is a certain level of order I require for living and for working in my studio. I have to have some clear table space. I have to be able to walk around the room freely without tripping over a pile of fabric. I have to be able to believe I can find a pair of scissors without much effort. When I start to realize things are getting too far out of control, then I stop and take the time to put things back in order.


Quilting Room Nice and Orderly

What else do I do? I check my email. I sometimes have a cup of tea and sit in the space and look at whatever I have on my design wall, be it a piece in process or some scrap of paper I have put there that interest me. I may flip through a book, a magazine or an old sketchbook. I might do some thumbnail sketches or sort fabric. Recently I have started playing a lot of music which has been a joy. For years I have worked in silence and I do enjoy silence, but music has entered my head and it has become an element in finding that blessed zone where I can work on my art.

Sometimes, toward the end of a piece when I can see that it is coming together, I can't take time to straighten things up. I keep working until the piece is finished. But before something new can begin I have to clear the decks.

If you have never considered what you do to get your creativity in gear, I encourage you to observe yourself and practice building habits which will strengthen your studio experience and the resulting work.

Thank you for spending time with me and your comments are always welcome.

Wednesday, March 24, 2010

Loving Instant Potatoes


Finished Fabric

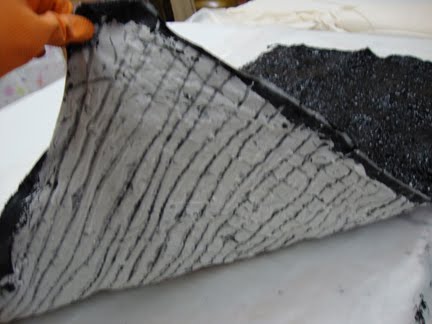
My last post featured the beginning process of using Instant Potato Flakes as a resist. It was messy but the results are beautiful!


Dried Potato Resist

Here you can see how the paste has dried. It took 3 days including putting outdoors in the sun on the last day. Notice now the fabric has curled. I had it pinned down but the tension from the drying pulled the pins out.


Notice how irregular the marks have become. As the paste dries it pulls away from the fabric around the edges and makes beautiful markings.


Once the potato paste was dry I applied the thickened dye. I used a Pro Chem Black 609 and a very thick print paste. Due to the extreme texture of the surface, I had to use a short bristle brush and dab the dye paste on.


You can see how the dye is seeping through the marks made when the paste was dry.


This picture is still the back of the unprocessed fabric but it looks the way I thought the piece would look when finished.....not so.

After 48 hours I folded the fabric up and baked in the oven set at 200 degrees for about 20 minutes. The entire house smelled like mashed potatoes.


Finally I just could not wait any longer and decided to wash things out. It was cold and windy outside but that's where I had to go for this job. I laid the fabric on the grass and soaked it good with running water. I used a plastic spatular to scrap off the paste and finally resorted to the bondo scraper as this paste really clings.


We have had very chilly weather and I don't think I had kept the fabric warm enough as there was lots of dye run off and it back dyed the fabric but the color is beautiful. Look at the exotic marks. I see all sorts of little people, animals, plants etc.


There are lovely violet markings as well. I have been working in such a loose way that I never know if I can repeat something but I'm planning to work with this more and see what happens.


So here we are back with the finished fabric. I'm not sure what is next but I do plan to make this into a finished piece. I'm thinking it needs friends.


Thank you for visiting and your comments are very welcome!

Friday, March 12, 2010

Does Your Quilting Support Your Ideas?


Work in Progress
approx. 16" w x 21" h


My blog entry for today is a simple piece touching on the topic of quilting, the actual stitching of at least two layers of fabric (or other material) together.

When I first began to quilt I tried my hand at hand quilting and used very traditional quilt patterns. As my work developed and I realized my quilt work was going to become my artwork, I began to see that these traditional patterns carried with them the history of quilt making in exactly the same way as traditional patterns of piecing did and they did not apply or support my work.

Next I began to learn the difficult skill of machine quilting. It has been a real journey for me and I have experimented with all kinds of techniques, thread types, various machines and ultimately discovered that most often simple straight line quilting most supports my ideas. Notice I say supports.

Here is an example of my quilting on a large composition.


Passion
This piece has been selected for Artist As Quiltmaker 2010


I have used multiple colors of rayon thread which enrich the overall color and complexity of the piece as well as creating a rich surface texture. It enhances the piece but does not overpower the composition or become the first thing you notice. In this example you an see that thread colors do not always run across the entire face of the fabric so there is an additional plane of pattern which lays on top of the primary composition. I often use rayon thread as it adds a nice shine and the color range is excellent. In most cases I choose to use solids colored thread. On occasion I do use variegated thread but I have to be very careful. If it is a type of thread where the color changes are very regular, it creates a unwanted moire' pattern which possibly does not happen when you quilt with complex patterns. The straight lines are also a nice counterpoint to the soft contours of the large shapes. Had I overlaid this piece with a more complex quilt line, because of the broad expanses of fabric, the quilting would have taken center stage and that is not what I want.


detail of composition with variegated thread


This example not only shows the moire' pattern I spoke of but the actual color changes in this thread were not a good choice. It is distracting and becomes too important visually.


For the piece pictured at the top of this page, I choose to use a variegated thread from Aurifil's line which is called Acquarelli. This small collection of threads are variegated but not in a regular repeat and it works beautifully for my straight lines. Below is a detail and up close you can see where the colors change but it does not create a pattern. This is a beautiful line of threads and I would love to see them add to this collection.


detail of work in progress


I have seen beautiful, sophisticated compositions ruined through poor choices of quilt lines most often lines that just don't relate to what the artist has created. I suggest using your computer to 'test drive' line work or create a small test piece. Over time you will begin to get a feel for what works for you and supports your art best.


Thank you for visiting studio 24-7 and I love hearing from you. Monday I will be presenting Nancy Natale and her excellent encaustic work. Hope to see you then.


Saturday, February 27, 2010

Study In Black and White


Study In Black and White


This fall I had work in Quilt Visions: Interpretations exhibition. As part of this show, participants were invited to send a 12" x 12" piece in black and white for a second show.

I sent a piece titled Study In Black and White for this event but failed to photograph the work. I also did a blog post, Sometime You Feel Like A Nut, about doing that. The piece was returned and it has been documented so I thought I would share it with you.


This piece was cut from a larger length of cloth I had painted. While I sometimes soda soak my fabric, most of the time I use mixed alkali to activate my thickened dye paste. I have fallen in love with the freedom of painting directly on the fabric or on an acrylic sheet and mono printing from that.


Since the piece is small, I did a lot of stitching using pearl cotton, embroidery thread and quilting thread. I like the little ends I left.


The secondary show was a sort of fund raiser for Quilt Visions and all the work was priced the same and I felt sure I'd never see this one again but alas I was wrong. I decided a long time ago that I don't know what people want so no need to worry.

I washed out about 12 yards of monoprinted fabric today so I'm ready to rock and roll.

Friday, February 19, 2010

Let's Have Leftovers!


LEFTOVERS


Everyone loves leftovers....well maybe in regards to not having to cook. But how about fabric leftovers?

Last year I hosted an online project entitled COMPOSITIONAL CONVERSATION. This project involved a group of artists each working in turn on one composition. One of the guidelines was that when it was your turn to work with the project, you could remove any elements from the composition you felt were not working but these elements had to be passed along to the next artist who might want to re-introduce them. At the end of the project there was a sad plastic bag of these pieces, some of them cut to tatters.

I studied this artifact of our experiment and would have discarded them as I generate enough leftovers (often donated to elementary schools and the like). However, I have heard Kentucky artist, Kathy Loomis, express her love of other folks fabric leftovers so I emailed her and she happily said she wanted them.

What could there be about these assortments of scraps that is attractive to someone? Is it because they have a history? Do these shunned remenants have some sort of built-in predisposition for coordination? Is it thriftiness on the part of the interested artist harking back to the origins of quiltmaking? Is it bravado on the part of the new scrap owner saying, "I can make something of nothing"? Or is it simply these collections of leftovers somehow speak to the new owner in a way many of us don't hear?

I invite you to visit Kathy's new blog Art With A Needle to find out and to see what she has made with our COMPOSITIONAL CONVERSATION leftovers.

So. How do you feel about leftovers? Would love to hear your experiences and thoughts.


Thursday, May 7, 2009

Cut Paper Studies

Generally, when I begin a new piece, I have an idea of what I want to explore. The idea may be sparked by something I have seen, a piece of music I like or a specific piece of fabric that sets my direction. I may start by doing a few thumbnail sketches or sometimes I just begin by pinning fabric to my design wall and start to organize that space with shapes as I cut them.

On occasion I may do a few cut paper studies which help me discover new shapes or new relationships between shapes which interest me. I like to keep things simple so I most often use black and white construction type paper to make the studies. I cut shapes and arrange them until I find something I like. Sometimes I glue the shapes down, sometimes I just staple the shapes to the base paper.

Here are examples of pieces that were created using this technique:


This study is 12" x 12" and the shapes are glued to white paper.


My interpretation of the above study is entitled SHE CAME UNDONE and it is 45" wide x 49" high.


This study is also 12" x 12". If you look closely you can see the staples along the top and bottom where some of the pieces were stapled.


The title of this piece is THE MYSTERIOUS STRANGER and it is 84" w x 88" H.